Raspberry Pi Pico is a tiny, fast, and versatile board built using RP2040, a brand new microcontroller chip designed by Raspberry Pi in the UK. — Raspberry Pi People
I picked up a Pico for a couple of bucks to try it out. In a time of extreme scarcity and shortage in silicon, I’ve started evaluating different options, and the RP2040 is very available. It hosts a dual Cortex M0+ processor with 264k RAM and all the usual peripherals. However, it lacks flash. The chip requires an external QSPI flash to hold the program instructions.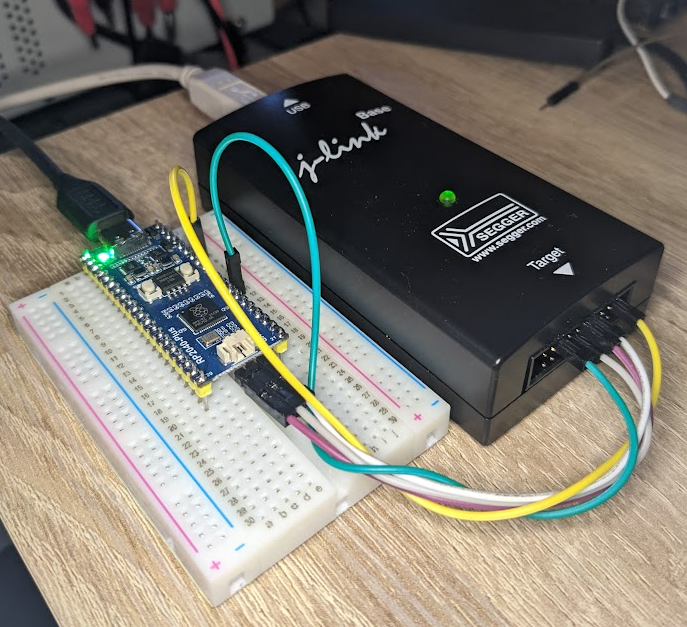
To program the chip, you hold the boot button while plugging in a USB cable; the chip will come up as a mass storage device. Then drag and drop in the image. This would be incredible functionality if I needed a client to flash their device. However, for development, I reached for my Jtag programmer.
It seems like most people are using the Pico Probe, which is another Pico board acting as a programmer. This is an excellent solution for someone that doesn’t have a Jtag debugger, but I only have a Jlink and don’t want to buy another Pico just yet.
Let’s get going: start by removing openocd. The version of openocd for this is not upstreamed yet.
git clone https://github.com/raspberrypi/openocd.git
cd openocd
./bootstrap
./configure --enable-picoprobe
make -j$(nproc)
sudo make install
As for wiring…
- Pico SWDIO to Jlink SWDIO, Pin 7
- Pico SWCLK to Jlink SWCLK, Pin 9
- Pico GND to Jlink GND
- **Pico 3V3(OUT), Pin 36 **to Jlink VTref, Pin 1
- **Pico RUN, Pin 30 **to Jlink RESET, Pin 15
Here is the flash script I got working.
#!/bin/bash
openocd -f interface/jlink.cfg -c "transport select swd" -c "adapter_khz 6000" -f target/rp2040.cfg -c "program blink.elf reset exit"
Good luck!