The nRF52 is a very popular Bluetooth chip that has taken over most of the wireless embedded space. The system-on-chip (SoC) houses an ARM Cortex M4 and 2.4Ghz radio to implement various wireless protocols. In this tutorial, I want to walk through setting up a Zephyr RTOS environment and building/flashing some code to do some wardriving.
But first, what is wardriving?
Wardriving is the act of searching for Wi-Fi wireless networks, usually from a moving vehicle, using a laptop or smartphone.> — Wikipedia
We’re going to do some “Bluetooth wardriving”, and we’re not going to be driving. I’m planning on “forgetting” a battery-powered nRF52 in a public space for a few days and see what sort of Bluetooth data we can collect.
If you’re following along at home, you’re going to need the following things.
- nRF52DK, I’m using PCA10040
- Unix system or WSL
I’m going to be using Zephyr RTOS, so before getting started, do all this and install nrfjprog.
Project Requirements
Before we start, it’s a good idea to define where we want to end up. I’ll list some requirements below.
- The device can scan for nearby Bluetooth devices.
- The device can timestamp the data.
- The device can keep the addresses in non-volatile memory
- The device is battery-powered and lasts for days.
Building / Flashing Blinky
Please keep in mind code prefixed with “$” are bash commands, while code with no prefix is output. To conserve space, I haven’t displayed all output. Start by navigating to the zephyr folder and update. I am assuming you checked out zephyrproject right in your home directory.
$ cd ~/zephyrproject/zephyr/
$ west update
$ ls boards/arm | grep nrf52dk
You should get an output of all the nrf52dk boards. Most likely, you want nrf52dk_nrf52832. So let’s build some simple firmware for that board.
$ cd samples/basic/blinky
$ west build -b nrf52dk_nrf52832
$ west flash
You should now get a blinking light. What a pain in the ass; feel free to turn back and use Segger Studio forever.
Device Tree
A keen observer would note that samples/basic/blinky/ is not related to any specific hardware. Blinky knows the correct GPIO for this LED using the nrf52 device tree file.
$ cd ~/zephyrproject/zephyr/ # Move back to the project root
$ find . -name nrf52dk_nrf52832.dts
./boards/arm/nrf52dk_nrf52832/nrf52dk_nrf52832.dts
Take a look at that dts file and look for a “led0”. The device tree file provides information to a generic project about a specific board. Device tree is extremely powerful and used all around the Linux Kernel. If you want to understand the ins and outs of Device Tree, I would recommend this video, but I will talk more about it later on.
Config Files
Before we move on, it’s important to understand the config system. These are files of the form: *.conf and *_defconfig. You can edit these files manually or with menuconfig. After launching west build you should see something like this.
Loaded configuration '(path)/nrf52dk_nrf52832_defconfig'
Open this file up and take a look. This is the base config for your board. There is also an prj.conf in the blinky folder, and this gets merged with the base config and written to build/zephyr/.config . Let us take a look at menuconfig.
west build -t menuconfig
Menuconfig is an interface to enable and disable settings; these settings will get saved to a config file.
Bluetooth Central
Let’s do something with Bluetooth! We want to develop a device that scans for other Bluetooth devices. This is called a “Central” in Bluetooth speak.
$ cd ~/zephyrproject/zephyr/samples/bluetooth/central_hr
$ west build -b nrf52dk_nrf52832
$ west flash
$ screen /dev/ttyACM0 115200 # Or whatever ACM you are
# Now reset the board, you should see something like this \/
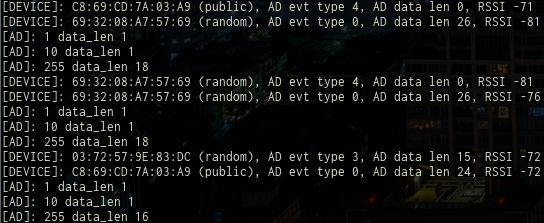
These are the MAC addresses of nearby Bluetooth devices. Here is a more extended output. I want to log these MAC’s with their Received Signal Strength Indicator (RSSI) and a timestamp. I want to use non-volatile memory, so that brings us to the next part.
SD Card
SD cards are a cheap and easy way to log some data from a microcontroller. They usually use SDIO but can also work over SPI. I had an Arduino SD card breakout lying around.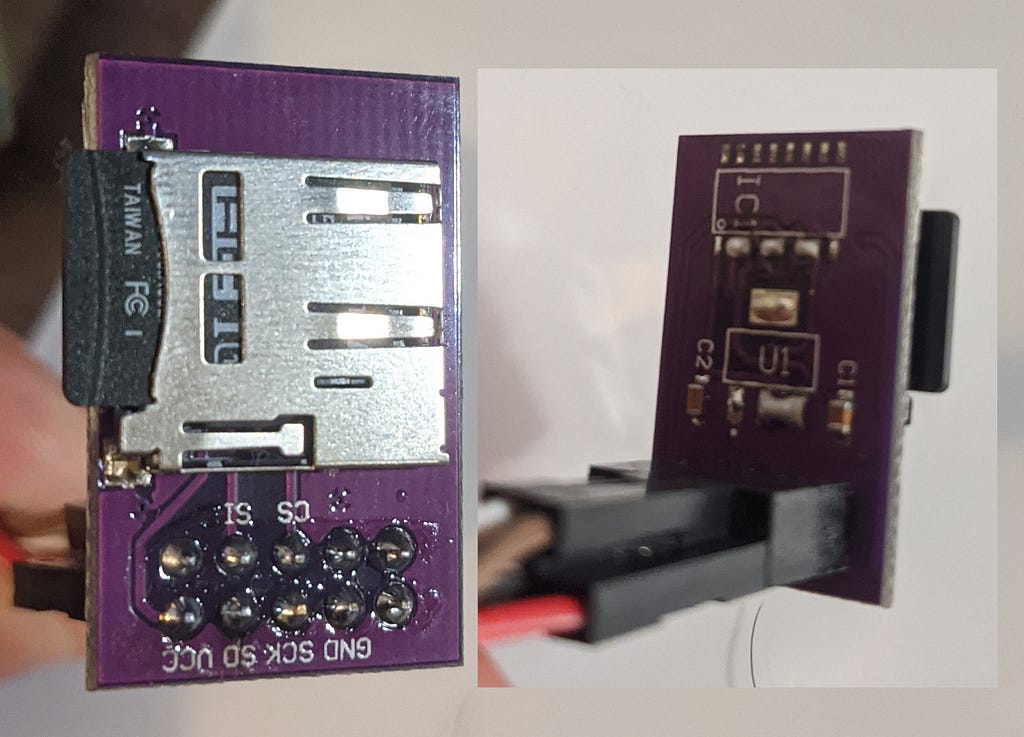
Most Arduino’s are 5V logic level while SD cards are 3.3V. This board has a 3.3V regulator and a level shifter to convert the logic levels. As the nRF52 is 3.3V, I ripped all that off and made the required modifications to interface directly. Let’s go to the fatfs project folder.
cd ~/zephyrproject/zephyr/samples/subsys/fs/fat_fs
Fatfs is a project created by Elm Chan which allows microcontrollers to recognize filesystems, specifically FAT and FAT32 filesystems. We can use fatfs to log data to the SD card. Take a look in the boards folder. We can see some *.conf and *.overlays files.
Device Tree Overlays and Configs
Device Tree overlays are special files that get laid on top of base device tree files. Let’s take a look in nrf52840_blip.overlay
 &spi1 {
        status = "okay";
        cs-gpios = <&gpio0 17 GPIO_ACTIVE_LOW>;        sdhc0: sdhc@0 {
                compatible = "zephyr,mmc-spi-slot";
                reg = <0>;
                status = "okay";
                label = "SDHC0";
                spi-max-frequency = <24000000>;
        };
};
This file is overlaying some information into spi1, it’s telling the build system that we want to use the spi1 bus for sdhc0 which is the sd card driver. We’re also specifying a chip select line. If we look inside nrf52840_blip.conf
CONFIG_DISK_DRIVER_SDMMC=y
CONFIG_SPI=y
We can see this config file is turning on spi and sdmmc. We now want to copy the nrf52840_blip files for use in our boards.
cd boards
cp nrf52840_blip.overlay nrf52dk_nrf52832.overlay
cp nrf52840_blip.conf nrf52dk_nrf52832.conf
cd ..
west build -b nrf52dk_nrf52832
Since your build board has the same name as the overlay’s, you should see something that says “Found devicetree overlay” and “Merged configuration” in your build spew. West will put the final device tree file in build/zephyr/zephyr.dts , you can open this up and see sdhc0 nesting inside spi1.
spi1: spi@40004000 {
    #address-cells = < 0x1 >;
    #size-cells = < 0x0 >;
    reg = < 0x40004000 0x1000 >;
    interrupts = < 0x4 0x1 >;
    status = "okay";
    label = "SPI_1";
    compatible = "nordic,nrf-spi";
    sck-pin = < 0x1f >;
    mosi-pin = < 0x1e >;
    miso-pin = < 0x1d >;
    cs-gpios = < &gpio0 0x11 0x1 >;
    sdhc0: sdhc@0 {
        compatible = "zephyr,mmc-spi-slot";
        reg = < 0x0 >;
        status = "okay";
        label = "SDHC0";
        spi-max-frequency = < 0x16e3600 >;
    };
};
You can then convert those hex values after sck-pin, mosi-pin, miso-pin to get your SD card wiring, and bob’s your uncle. Flash the board with west flash and open a serial port like before, pop in an SD card and reset your board — you should see something like this.
New Project
It’s about time we start to build our app. I want to fork this app and make it our own.
$ west init -m https://github.com/zephyrproject-rtos/example-application --mr main my-workspace
$ cd my-workspace
$ west update
$ cd example-project
$ west build
I had issues building this, so I wiped out most of the code and pulled in some of the other stuff we worked on before. You can see I’ve stripped out most of the existing Bluetooth code, as we’re only concerned with scanning for other Bluetooth devices right now. I pulled in the SD card stuff and tested it. I encourage you to look through the repository. The repository is open so that anyone can expand on the project.
One Small Hiccup
I noticed one of the LEDs on the board was flickering. This wiring isn’t ideal as I want to dead drop the device for days and flicker a pointless LED is very power hungry. I looked into the board’s schematic, and it turned out my chip select (CS) pin for my micro SD card was sharing a pin with LED1!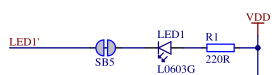
I changed the device tree file to use another pin, moved the jumper over and starting have issues mounting the drive. Looking at the schematic above, you can see the pin is being pulled high to Vdd through R1. When the SD card is powered on without the pullup, something goes wrong in the hardware. I added this pullup with a regular 10k, and it started working.
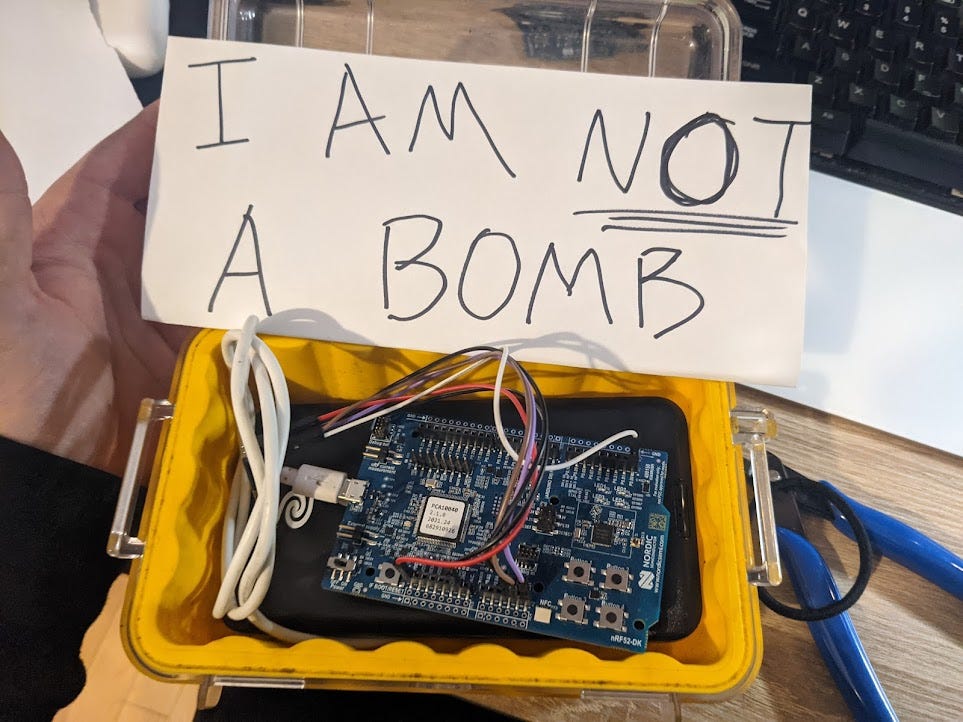
The Drop
With everything in place, it’s time for the dead drop. I opted for an old pelican case buried in the dirt.
While doing my usual 2 AM workout, I tripped, launching the device into a nearby hole. As I pulled my back at the gym, I couldn’t bend over to pick it up, so the only safe thing to do was bury the device and pick it once I had healed.
The Retrieval
Once my back healed up, I picked up the drop. I slammed together a quick python script to analyze the data, and it reported there were 7054 MAC addresses discovered and 799 unique MAC addresses! A keen code observer would note that I imported a little API for finding the vendors as well. I then plotted this.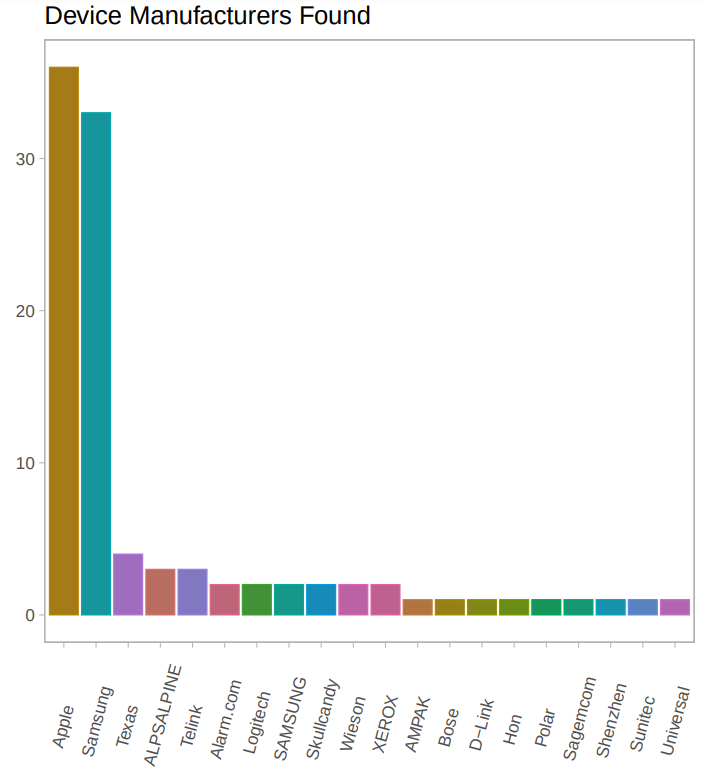
Moving Forward
I want to continue my wardriving work but up the ante with location inference. In the dataset, we have the RSSI strength, which is correlated to distance from the device. RSSI gives a magnitude of a vector with the angle θ unknown.
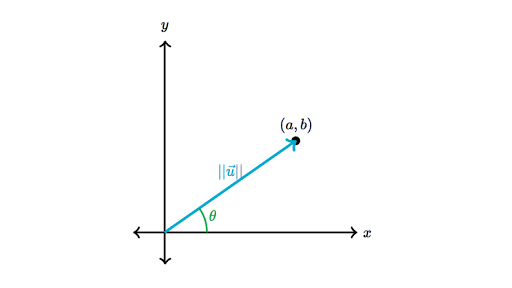
With some basic knowledge of the environment, i.e. people won’t be standing on obstacles. We can reduce the number of solutions. We can reduce the solutions set again by looking at the time series and understanding people won’t be jumping from place to place. Perhaps one day, we can fully track people just with Bluetooth.